A Few Thoughts…and a Simple Salad

Holy moses, it’s been awhile.

Some of you may have missed this…some of you may not have.  Either way, I have been woefully neglectful of my duties these days in trying out new recipes and ironing out the kicks, getting them ready for your consumption.  For this, I must apologize.  It’s fire season, folks, and that means I get a lot less time to work on the things that I enjoy.  This includes such awesome summer activities like mountain biking and barbecuing, swimming and hanging out in shorts.  It also unfortunately includes things to be enjoyed year-round, like seeing friends and family, playing roller derby, and keeping up on finding new awesome foods to power my day.

All that being said, I’m doing what I can.

I’m sitting in Flagstaff, AZ with my hotshot crew, prepositioning in the event we get a fire, large or small.  In essence, we’re waiting for the forest to start burning.  This might sound strange to most of you…most people spend their time hoping things won’t burn. In this case, we’re at the ready…and in the meantime, doing project work for the local district, pumping out lots of pushups and running a whole bunch, in preparation for the “big one.”  True story.

In case this sounds more than a little odd, I should offer a brief explanation: in most years (even this one, when things are fairly quiet), the powers that be will periodically move crews around the country to be where the fire danger is highest…before things start burning out of control.  The hope is that we will be closer to where we are most needed, should something happen.

This is a great idea, in theory, and can work really well.  In reality, we can end up sitting for days waiting for ignition that never comes.

Either way, it’s ok by me.  I get a rare opportunity to see a lot of the country, and work with some excellent people, building great relationships that have enriched my career.

Now, down to the business at hand…which, believe it or not, does relate to what all that drivel you just had to wade through to get to this point.  (Or maybe you skipped through all that to the food part.  That’s cool, too.)

In my career I have run the gamut between eating everything on my plate, regardless of content or quality, and eating almost nothing because none of it appeals to me.  I don’t often get the chance to be that picky; when you’re burning 6,000 calories a day, you aren’t very discerning about the type of calories you consume.  Full disclosure, I eat a LOT of Snickers bars.

But I am getting better, more informed about what is actually healthy and what isn’t.  These last few weeks, I’ve had the chance to be a little more choosey with my food.  So, in this vein, I’ve been eating a lot of salad and berries, bananas and almond butter, foil packaged salmon.  Things that are relatively quick and easy.

This week, I’d like to share with you my method for “dressing” my salad, as I hate buying bottled dressing.  I found this method a few months ago when I was making kale salad with grilled chicken.  It’s super simple and eliminates the need for messy oils; I’ve found that it tastes just as good with regular greens as it does with kale.

Basically, you just get yourself a lemon, a lime, and an avocado.  You cut open the lime and the lemon, and squeeze the juice over the greens (your choice as to whether or not you use the whole lime and/or lemon).  Then cut up your avocado and slice it into the bed of greens.  Now, lately I haven’t been squishing the avocado in because my hands aren’t that clean out here, but in a kitchen, you can get in there with your paws and massage it all together until all the leaves are coated with the lemon, lime and avo.

Voila.  Dressing.

Now you can add whatever you want.  Lately, I’ve been slicing in some strawberries, adding a handful of organic blueberries, sprinkling in sunflower seeds, and tossing in a little bit of feta.  Sometimes I add a little salmon for extra protein.

This is super simple, super tasty, and a good way to get some healthy fats.  Use it with kale or on a bowl of mixed greens fresh from the garden or, if you’re not that lucky (as I am not), from the farmer’s market.

Often I will throw the greens in a tupperware and bring the lime, lemon and avo with me, slicing it up later in the day.

Give it a go, and let me know what you think!

Spice It Up!!

If you’re like me, you want quick easy lunches that are portable.  Which means that salads, while nice, aren’t always an option.

So, if you’re like me, you eat a lot of tuna fish.  I mean, why not?  It’s quick and easy, it comes in its own container, and you get some great healthy fats and lean protein to fill you up.

Awesome.

But tuna gets…well, boring.  I don’t care how many ways you dress it up or what you put it on…it can get old.  So imagine my delight when I discovered this week’s recipe, which has all kinds of cool stuff going on with it.  It uses no mayo (which, by the way, I am not demonizing.  I love mayo.  And I’m all about a little fat in the diet.  But not necessarily mayo fat.), but loads up with avocado instead.  Plus, you add a few hard boiled eggs for extra protein.  More bonus points.  A little salt, a little pepper, some soy sauce and…wait for it…

Wasabi.

Yup.  Japanese horseradish.  For real.  And before you lift an eyebrow, try it.  Because I will admit some early skepticism, which was quickly dispelled when I consumed this tasty lunchtime treat.

For those unfamiliar with it, wasabi is the pea green paste served in a tiny, thumbnail-sized dollop with sushi, to help garnish and flavor your raw fish.  You can find it either in a powdered form in health food stores, or already mixed in most Asian food aisles in standard grocery stores.  It can pack quite a punch, so add with caution; however, even my sensitive little mouth required adding a little more when I pulled it out of the fridge the next day.  It seemed to lose its characteristic “wow” factor overnight.

image

I mean, think about it…good fish, lean protein, healthy fats, and the zing of wasabi to make this a winner.  You can’t go wrong.  Unless, of course, you don’t like the stuff to begin with…in which case, maybe wait for the next post, or visit the archives.

I really liked pairing this with some gluten-free crackers, a slice of Ezekial bread, or even on some romaine lettuce with tomato slices.  Yum!

Wasabi Tuna Salad

Ingredients

12 oz. canned tuna in water
1 medium ripe avocado
3 large hard-boiled eggs
1/4 c. diced onions
1/4 c. diced celery
1 t. lemon juice
2 T. soy sauce
salt and pepper to taste
wasabi paste

Directions

–Strain tuna, and place in a bowl. Add avocado, peeled eggs, onions and celery, and other ingredients.
–Slowly add wasabi to taste, so as not to overpower.

*Full disclosure, I did not use the onions. I just couldn’t do it. And it was still tasty…
*This is best used within a day or two of making it.

It’s Salad Time…

Ok, ok…I know it’s Cinco de Mayo.  But I’m not going to rev it up with some fake Mexicali-themed post in honor of the day.  Sorry in advance for that.

But I am gonna talk about summer.  Yep, ladies…it’s that time of year again.  It’s not quite warm enough for growing vegetables yet…at least not here in the mountain country.  But things are warming up and I’ve just had three gloriously sunny days to remind me that shorts are part of my wardrobe, that I need to put sunscreen on religiously and not just kind of sometimes when I feel like it, and that market season is coming and that means tons of fresh produce.  Like, more produce than I can eat (which is a lot).

It also means that salads are going to figure big in my daily diet again.  While always a staple, it just seems a little easier to subsist on greens and veggies when they are fresh and readily available.

So this week’s post is a recipe I just tried and quickly swooned over, because not only is it easy and quick, but it has some of my favorite stuff in it: tomatoes (lycopene!), cucumbers (detox and de-bloat!), olives (tasty!), and balsamic vinegar…which makes just about everything better.  (Ok…except for ice cream.  It probably wouldn’t make ice cream better.)

The best option for your tomatoes is to try to find some tasty heirlooms…but you can also use store-bought cherry tomatoes in a pinch.  Also, if you can find fresh oregano, great…but if not, don’t sweat it.

image

This salad was a nice side to a chicken and veggies dinner, and also made a great lunch the next day; but feel free to half the recipe if it just seems like too much.

Cucumber and Tomato Salad

Ingredients

2 c. cucumber, cut into cubes
4-5 heirloom tomatoes, halved or quartered
6 Kalamata olives, halved
1/4 c. walnuts, roughly chopped
2 T. oregano, fresh or dried
4 T. balsamic vinegar
2 T. olive oil
1/4 t. salt

Directions

–In a bowl, combine cucumbers, tomatoes, olives and walnuts.
–In a separate bowl, whisk together olive oil, vinegar and salt. Pour balsamic mixture over cucumbers, etc, and toss well.

Black Bean Bliss

Most of us know black beans are good for us.  As a healthy alternative in tacos and burritos, or a tasty addition to huevos rancheros, they make life just a little better.

Not only do they taste good, they do some great stuff for your body.  The high protein and fiber content help move food through your system, keeping your digestive tract healthy.  They help regulate your blood sugar, and contribute to your cardiovascular health with all the soluble fiber they contain.  They  also have a ton of folate (vitamin B6), which is important for  your nervous system; in addition, black beans contain lots of iron, which is particularly important for pregnant and menstruating women.

So, all this being said, I felt like finding this week’s simple, healthy recipe for black bean hummus was a tiny victory.

[Side note: I tend to get on food trends, where I find one or two things and then make them obsessively for weeks, until I find something else; for the last few weeks, this has been different varieties of hummus, or chickpeas in sundry forms.]

image

This black bean variation of hummus kind of made me do a little happy dance; I love chickpeas and all, but this seemed like a great way to get all the benefits of black beans and satisfy my craving for little snacky things during the day.  This way, I could munch on carrots or gluten-free crackers in the afternoon, or ease my post-practice hunger late at night without feeling waaaay guilty.

Yay!

So try this out.  I actually added a little cumin (ok, a lot of cumin…but I love the stuff) and some paprika, but this is totally up to you.

Black Bean Hummus

Ingredients

1 can organic black beans, drained
1 T. tahini
2 garlic cloves, crushed
Juice of 1 lemon
2 T. olive oil.
Cayenne pepper, to taste
Sea salt, to taste

–Combine all ingredients in a food processor or high speed blender, and combine until smooth.

*Recipe courtesy of http://www.iquitsugar.com*

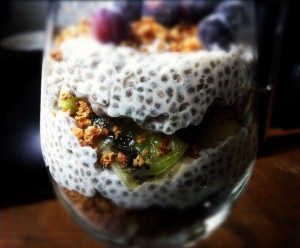
Chia Breakfast…Pudding?

Yep, you read right.  Pudding for breakfast.  And not that crappy instant comes-in-a-plastic-cup crap, although I’ve definitely eaten my share of it.  I don’t feel bad, really; I mean, the more folks I talk to, the more I realize most of us grew up eating the same pre-packaged, artificially-sweetened, over-preserved stuff that passes for food, then and now.  It’s not our parents’ fault; they were just doing what they thought was right and trying to feed a bunch of hungry kids.

But now, folks, we have choices.  And yes, we can still eat pudding, even for breakfast.  But maybe this time around we’ll make it a little healthier, and we’ll make it ourselves.

Always good to know what’s in your food, right?

I also haven’t really talked about either breakfast or chia seeds for awhile, so this is a good time to address both.  I hate to say this, but for the last few weeks, I’ve kind of gone off solid breakfast food, which means I haven’t really been experimenting as much as I normally do.  But when I saw this, I liked being able to prepare it the night before, and I liked the idea of being able to add whatever I want.  (Sometimes I don’t do so hot with recipes…I like to wing it.)

image

So I was pretty excited about the chia pudding parfait.  It’s a lot like overnight oats (see my post on it here: https://sarakmooney1.wordpress.com/2013/06/17/start-your-day-again/) in that you can make it the night before and then dash out the door with it the next morning, and that you can go wild with the ingredients, even though this calls for fresh fruit and granola.  You can use any dried fruit you like (blueberries, goji berries, raisins, apricots, whatever…), store-bought or home-made granola (I have a great grain-free granola recipe here: https://sarakmooney1.wordpress.com/2013/08/19/granola-goodness-grain-free/), and either buy non-dairy milk  or make your own creamy almond or cashew milk.

You also get a great dose of omega-3 fatty acids, which is a huge bonus, and the chia seeds help satiate you until your mid-morning snack or even beyond.

image

You don’t necessarily have to soak this overnight; you can let it sit for a couple hours and it should be just fine.  However, since I like this for breakfast and I’m usually short of time in the mornings, I make it the night before and then throw the layers together in a mason jar to take with me.  Also, if you don’t really like the “tapioca” texture of chia seed pudding, you can whirl it quickly in the blender to smooth it out a little.

Mighty Chia Pudding Parfait

Ingredients

3 T. chia seeds
1 c. non-dairy milk
1/2 t. pure vanilla extract
1.5-3 t. maple syrup or agave, to taste

For the layering

fresh or dried fruit of choice
granola
etc.

Directions

–In a medium bowl, whisk together chia seeds, milk, vanilla and sweetener. Cover and refrigerate overnight, or at least 2 hours, to thicken.
–Place chilled pudding in a glass (or mason jar, if you’re taking it with you), alternating with layers of fruit and/or granola.


*Recipe from The Oh She Glows Cookbook*

To Be A Kid Again…

I know we’ve all done it.  Cut open one of those tubes of pre-made cookie dough and chowed down.  You can’t deny it…don’t even try.  But the blessing here is that there’s no judgement here; I’ve done it, too.  I’m not proud…but there it is.

The other crying shame is that I really, really like it.  I know, I know…it’s not really fashionable to admit that kind of stuff, but let’s face it: health coaches get cravings, too.

So I was pretty stoked to start finding recipes that mimic the flavor and sinfulness of raw cookie dough…without the guilt.  Such is this week’s recipe, so I thought I’d share.  You can mow these down and not feel terrible afterwards, and not have to answer to either your nutritional conscience or your digestive system.

I am so on board with this.

I know this doesn’t really qualify as a “power snack”…but if it helps satisfy my sweet tooth, I make exception.  I hope you enjoy it as much as I do.


image


Peanut Butter Cookie Dough Bites

Ingredients

1.5 c. gluten-free rolled oats
2 T. coconut oil
2 T. smooth peanut butter or other nut butter
1/4 c. pure maple syrup or other liquid sweetener
1 t. pure vanilla extract
1/2 c. almond flour or almond meal
1/4 t. fine grain sea salt
2 T. mini dark chocolate chips or chopped dark chocolate

–In a high speed blender, blend oats until fine flour forms.
–In a large bowl, combine the oil, nut butter, maple syrup and vanilla and beat until smooth. Add oat flour, almond meal and salt and beat again until combined. Fold in chocolate chips.
–Roll the dough into small balls (about 1 T. of dough each). Place the finished bites on a plate lined with parchment paper.
–Freeze the bites 5-10 minutes or until firm. Store the bites in the freezer in a freezer bag for quick and easy snacks.

*Recipe courtesy of http://www.ohsheglows.com

My New Favorite…

First, I have to apologize for not getting a recipe out to you last week; life has been a little hectic lately and frankly, not being in my own kitchen has really thrown me for a loop.  I don’t have any of my normal tools or my stockpile of tasty, organic, fancy-pants ingredients…or a bunch of extra money to try to buy them all over again.  So this limits me to finding easy recipes that don’t involve a lot of extra stuff.

I’m doing my best to keep up the flow of quick, healthy recipes and commentary in the midst of transition.

But now down to the business at hand.  Since we’re on a smoothie kick here…well, I am.  Last week I embarked on a rigorous green smoothie regimen, and let me tell you, it’s been an interesting ride.  Mainly because at any given time, the smoothies I come up with can either be wild and tasty successes, or tragic and uncomfortable exercises in taste sensation.

But a little while ago, I hit upon a particular recipe that was just, well, rad.  So I’d like to share that with you, and a few of the benefits as well.

Mainly, you’re going to get some powerful antioxidants from the blueberries, plus a good dose of calcium from the spinach.  Plus the mango and apple juice add a touch of sweetness.  (You can substitute clean, filtered water for the juice if you want.)  I like to boost my smoothies with greens powder, so I get some extra nutrients; I also like to add an unflavored, high-quality protein powder to give it some extra staying power through my busy mornings.

Because I like to operate on auto-pilot first thing in the morning, I try to make my morning routine as easy as possible.  I have found that if I prepare my smoothies at night and make a little extra, I make the process of getting out the door a little easier, and I have enough smoothie to get me through my morning workout and push me through until lunchtime.


image


1 c. organic apple juice
1 c. packed spinach
1 c. frozen blueberries
1/2 c. frozen peaches
1/2 c. frozen mango
1 scoop greens powder (optional)
1 scoop protein powder (optional)

Place apple juice and spinach (plus greens powder and protein powder if you are using them) in a high-powered blender and combine until smooth. Then add all fruit and blend smooth.

Smoothie Perfection…

I’m not going to bore you with how great green smoothies are for you…I mean, unless you’ve been living under a rock, you already know this.  I don’t need to go on and on about how much energy you’ll have or the weight you’ll lose, or how many greens you can pack into a blender…blah blah blah.

Nope.  Not going there.

However, I do want to talk a little bit about a green smoothie-making method that might make you want to pay a little more attention to this healthy habit.  That might make you want to actually make it a habit, instead of just something you sort of try out and hate but maybe do anyway for awhile because you think you should.

Because, if you’re anything like me, you heard about ’em.  You thought, can’t hurt, right?  So you tried ’em: you went out and bought a bunch of “healthy stuff” and stacked it in a blender.  You got some kale and some almond milk, an apple and a banana…maybe you squeezed in some ginger and chia seeds and maca powder and…ok maybe you didn’t use maca.  But you get my drift.  You threw it all in and hoped for the best.

And what came out was, well…shall we say, less-than-tasty.

But here’s where this great-green-smoothie-making formula comes in…this is going to help, I promise.

There’s not much to it; I mean, what are you working with here?  A liquid base (juice, nut milk, water, whatever), some greens (the sky is the limit here), and some fruit.  Oh, and if you want to add in some “boosters”, that’s great too…but we can talk about those later.

image

So you want a 1-1-2 ratio for these three things; that is, one cup base-one cup veggies-two cups fruit.  This will give you a ton of nutrients, fiber and even protein (depending on what you’re using), but also keep it sweet enough so that any green smoothie neophyte won’t be scared off.  (FYI, my boyfriend even liked this mix-up…and he’s pretty much a steak-and-eggs, meat-at-every-meal type of guy.)

image

To start, pour your one cup of liquid base into the blender; I recommend a homemade or unsweetened store-bought nut milk, or water.  You can use juice, but it’s really best to make your own due to the high sugar content of most store-bought juices, and this can be time-consuming.  A quick alternative is to use 1/2 cup juice and 1/2 cup water, to cut the sugar a little.

Next add the greens.  I use kale…a LOT.  But I also like spinach, beet greens, dandelion greens, whatever.  Just make sure you’re washing it well, and de-stemming the kale or chard or whatever you’re using.  At this point, I also add in any powders I might want: greens powder, protein, maca, etc.

Now blend it all smooth.  This is the key…unless you want to chew your green smoothie, and at that point, you might as well just have a salad.

Now add the 2 cups of fruit.  Apples and pears are good standbys (core and roughly chop them), as are bananas and grapes (you can freeze both of these to keep longer, and to help chill the smoothie).  I also like to use frozen fruit, since it eliminates the need for ice; I try to buy a bunch of when it’s on sale.  Blueberries, strawberries, raspberries, mango, peach and pineapple are all good options; you can also buy your own produce and freeze it, if you’d really like to cut down on processed stuff.

image

Now blend it all smooth again, and voila!  Your perfect green smoothie.  Feel free to boost it with whatever you want: chia seeds, coconut oil, nut butters, even walnuts.  These should be added when you add the powders.

I think you’ll find that if you replace even one meal with a green smoothie, you will have increased energy and stamina, and feel better through the rest of your day.  Make extra, and take it for a healthy snack mid-morning or post-workout.  (I know, I said I wouldn’t get started on the benefits.  I just couldn’t help myself…)

Give it a shot.  I think you’ll be pleased.

The Sequel…

Maybe this is just a continuation of the last post…maybe I’m starting to freak out a little because my work season is drawing closer and my days of carefree skiing and puttering around my kitchen are coming to an abrupt end.   I shiver a little bit when I think about it.

Such is life.  Someone needs to pay the bills…and the cats sure aren’t going to do it.

Regardless, I have been digging out great energy bar recipes and trying them, looking for the best one…knowing that there is fast coming a time when my life is going to be less about real food and nourishing meals, and more about finding quick snacks to fuel myself with.

We’ve all been there.

image

So this week’s recipe made quite a splash, mainly because it is in keeping with the “dump everything together and pour in a pan and freeze” motif that I am enjoying lately.  There’s some minor melting of nut butter…other than that, I don’t think this gets much simpler.  Mix it all together and press it into a pan covered with parchment paper…you don’t even really need to wash the dish afterwards if you don’t want to.  How awesome is that?

The result is another great granola bar that, once cut into pieces, can be put into snack size baggies and stored in the fridge or freezer for quick access.

image

A few notes: I actually didn’t use the rice crisp cereal, because I didn’t have any on hand; I still think these came out fine! Also, I substituted maple syrup for the brown rice syrup, and flax seeds for the hemp seeds.

I’m sold.  I think you will be, too.

Classic Glo Bar

Ingredients

1 1/2 c. gluten-free rolled oats
1 1/4 c. rice crisp cereal
1/4 c. hemp seeds
1/4 c. sunflower seeds
1/4 c. unsweetened shredded coconut
2 T. sesame seeds
2 T. chia seeds
1/2 t. ground cinnamon
1/4 t. fine-grain seas salt
1/2 c. + 1 T. brown rice syrup
1/4 c. roasted peanut butter or almond butter
1 t. pure vanilla extract
1/4 c. mini non-dairy chocolate chips (Enjoy Life brand)

Directions

1. Line a 9″ square pan with two pieces of parchment paper (one going each way).
2. In a large bowl, combine the oats, crisp cereal, hemp seeds, sunflower seeds, coconut, sesame and chia seeds, cinnamon and salt and mix.
3. In a small sauceoan, melt the syrup and nut butter together until well combined. Cook over medium-high until mixture begins to buble and soften, then remove form heat and stir in the vanilla.
4. Pour the nut butter mixture over the oat mixture (be sure to scrape all the remnants out of the pan). Stir well until all the oats and cereal are coated with the wet mixture. If you are using chocolate chips, let the mix cool slightly before you fold them in. This will keep them from melting.
5. Pour the mixture into the prepared pan, spreading it out evenly. Using a pastry roller (or just folding the parchment paper over and pressing firmly with your fingers), compress the mix firmly. This helps the bars hold together better.
6. Plaace the pan in the freezer for 10-15 minutes, until firm.
7. Lift the square out of the pan with the paper, and slice into bars. Wrap in plastic, foil, or baggies and store in the fridge for up to 2 weeks. You can also store them in the freezer for up to a month.

*Recipe courtesy of Angela Liddon

Super-Stoked on Sugar Free Granola Bars…

I am on some sort of bar kick right now, I swear.

But I’m good with it…I mean, that’s what I end up reaching for when I need a quick boost before a morning workout to get me through until breakfast, fuel for a 10 am feeding, or a mid-afternoon pick-me-up. I mean, you can only eat so many almonds. (And I love almonds.)

So it was really nice to find this super-quick recipe for some easy granola bars, that don’t have any sugar and taste great, to boot. These little babies are sweetened with Medjool dates (you can use any dates, really, as long as they’re pitted), and also get a touch of sweetness from the cranberries (good for urinary tract health!). I like to use dried cranberries that are sweetened with organic apple juice…yummy!

20140301-071458.jpg

These also have chia seeds, which, if you’re a regular reader, you already know I’m a fan of when I’m looking for a super food to boost my energy and give me some extra staying power for whatever sport I’m pursuing on any given day.

A few notes: This recipe calls for gluten-free oats, but of course you could use regular rolled oats as well. Also, you can use roasted sunflower seeds or pumpkin seeds in a pinch…but it will definitely change the flavor of these bars.

Either way, they are tasty treats and could easily become a staple in your arsenal of quick snacks. Enjoy!

20140301-071747.jpg

Sugar-Free Granola Bars

Ingredients

3/4 c. gluten-free rolled oats
1 c. water
3/4 c. packed, pitted Medjool dates
1/2 c. chia seeds
1/4 c. raw sunflower seeds
1/4 c. raw pumpkin seeds
1/4 c. dried cranberries, finely chopped
1 t. cinnamon
1 t. organic vanilla extract
1/4 t. salt

Directions

1. Preheat oven to 325 degrees; line a 9″ square pan with two pieces of parchment paper, one going each way.
2. Place oats in high-powered blender; grind into fine flour and place in large bowl.
3. Add water and dates to blender and process until super smooth. (Soak dates for 30 minutes if they are too firm.)
4. Add water, dates, and all other ingredients to th oats in the bowl and stir to combine.
5. Scrape into prepared pan and spread out flat. Bake at 325 for 23-25 minutes until firm. Cool in pan 5 minutes, then transfer to cooling rack for 5-10 minutes more. Slice into bars. Freeze remainder if necessary.

I placed mine into small snack-size ziploc baggies; you can also wrap them individually with saran wrap for easy grabbing on the go.

Recipe courtesy of http://www.ohsheglows.com